| The Raids on Zeebrugge and Ostend, April 1918 |
| The intention of the raids on Zeebrugge and Ostend was to block the passage of German submarines and destroyers between the inland port of Brugges and the open sea. Whilst a force from HMS Vindictive created a diversion by storming the far end of the Zeebrugge mole, HMS Thetis, HMS Intrepid and HMS Iphingia were to enter the harbour entrance and manoeuvre to block the channel. Once the battered armada struggled home, the Admiralty launched a massive Press campaign lauding the success of the raid but the truth was otherwise. The block ships could not be placed so as to close the harbour entrance completely and after dredging the West side of the passage, German submarines could once again move freely to and from the English Channel and the North Sea. The operation was a failure and many brave officers and men, all volunteers, were killed or wounded. With hindsight, it can be said that bravery and immense courage cannot overcome the imprecise planning which characterised the Zeebrugge raid with its "All will come out right on the day" approach adopted by the Admiralty. The two raids on Ostend were also failures, the blockships of the first raid missed the harbour entrance and the second attempt was abandoned with the blockship rendered out of control and in the face of strong German resistance. An unexpected sequel to the raids was that banks in neutral countries were impressed by the fact that despite the stalemate in the land war, the British could move a fleet of over 150 ships across the North Sea to mount raids on the German-occupied coast without the German Navy making any strong preventive attack. Although suffering set-backs from the activities of the large German submarine fleet, Britain still maintained control of the seas around Germany. Confidence in Germany winning the war was shaken and the foreign bankers severely limited credit to the German Reich whilst suppliers demanded payment in gold and in advance. 10th May 2021, More photographs added. |
|
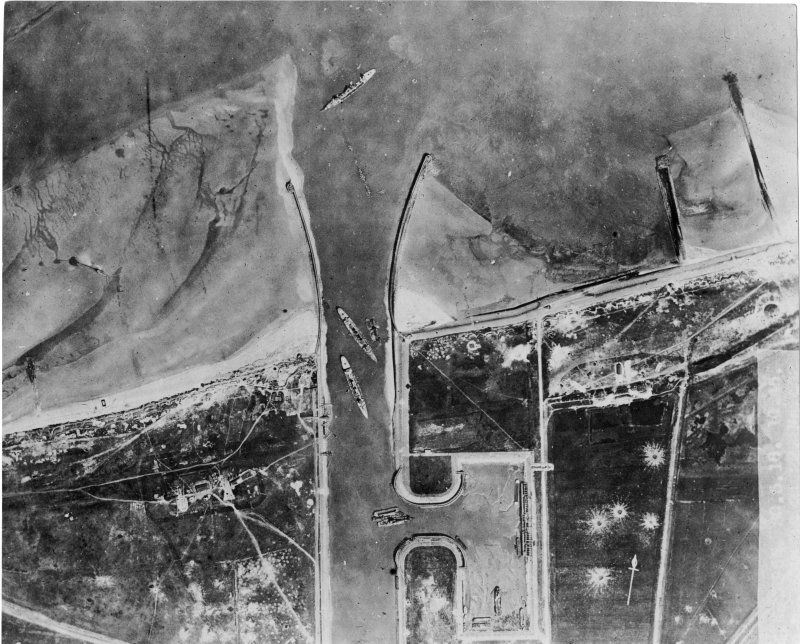
Catalogue number 17034 An aerial view of Zeebrugge after the raid. This British aerial photograph taken at low tide shows the harbour at Zeebrugge shortly after the Royal Navy operation of 21st-22nd April 1918. From top to bottom of the photograph, we can see HMS Thetis, HMS Iphigenia and HMS Intrepid. It is not difficult to see that the position of the two blockships does not prevent vessels from passing back and forth through the channel and after removing some wooden piles from the West side of the pass (the work is underway in this photograph) and dredging, submarines were able to pass by the stern of the blockships. The white star-like shapes to the right of the harbour entrance are craters made by heavy shells fired from Royal Navy monitors, small shell craters can be seen further to the right. 16.9cm x 14cm Gelatin silver print |
 |
|
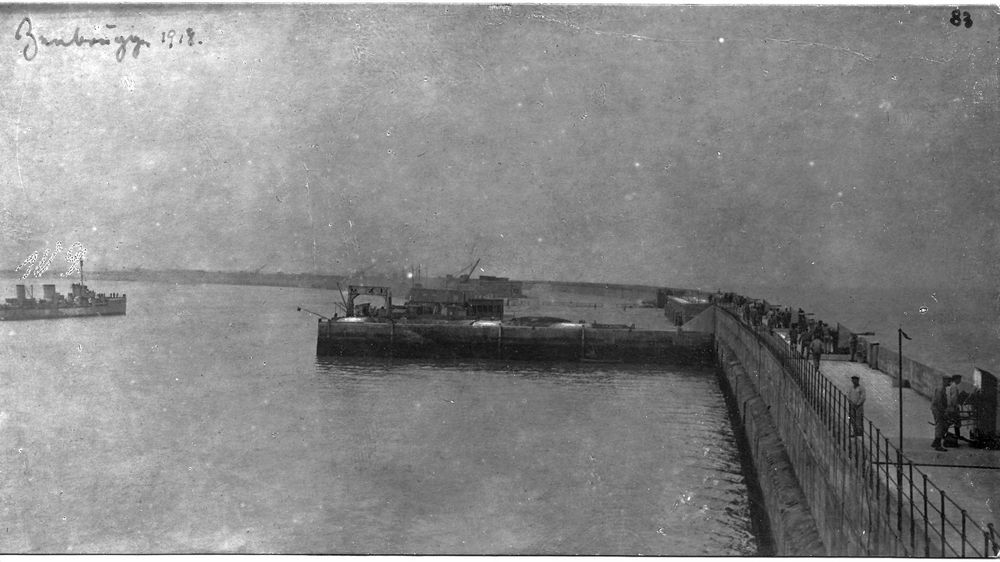
Catalogue number 35137 The mole at Zeebrugge. This long concrete curving structure was nearly 2 miles long and consisted of a causeway jutting out from the coast then a steel viaduct leading to the mole itself of more than a mile long and 80 yards wide with a wall and parapet to the seaward side. Here we can see to the right of the photograph, the extension of the mole with its four-foot parapet lined with 3.5-inch and 4.1-inch guns. This massive breakwater protected the two jetties at the entrance to Zeebrugge harbour. When HMS Vindictive approached the mole, these guns were firing at point blank range. Retro: "Zeebrugge 1918" in green ink. 13.4cm x 7.3cm Gelatin silver print |
 |
|
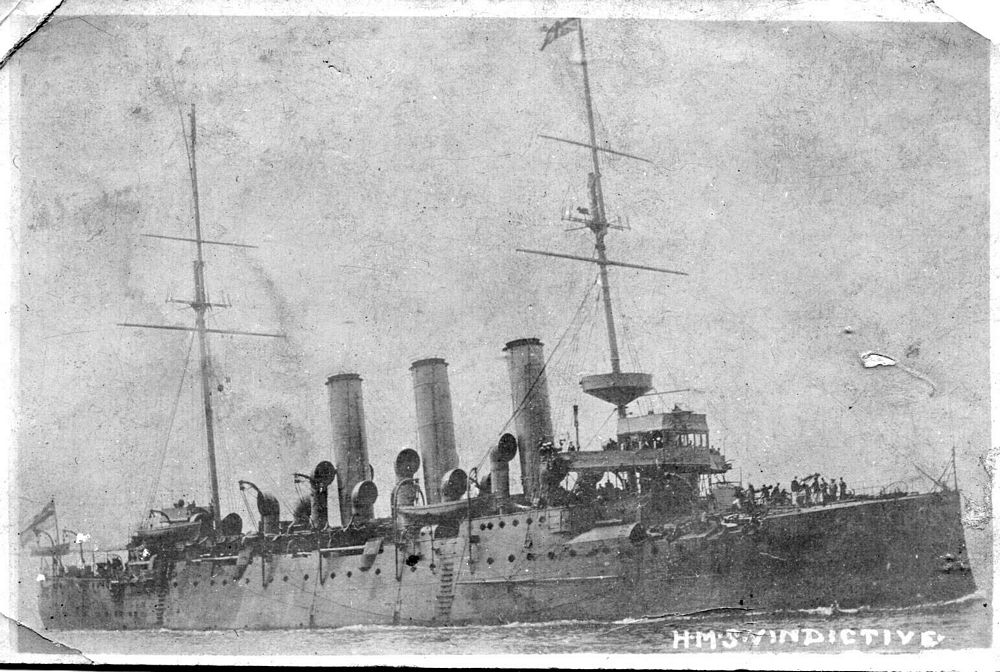
Catalogue number 78015 HMS Vindictive HMS Vindictive was an Arrogant class cruiser commissioned in 1900 and certain aspects of her design suggested that she would make a good assault ship. The Arrogant class were designed to employ out-of-date ramming tactics and so had good manoeuvrability and a strong ram bow on a strengthened bow structure. The control tower also had thick armour to give protection when manoeuvring close to an enemy. These qualities would be useful when approaching and then coming alongside the Zeebrugge mole whilst under fire. 13.8cm x 8.3cm Gelatin silver print |
 |
|
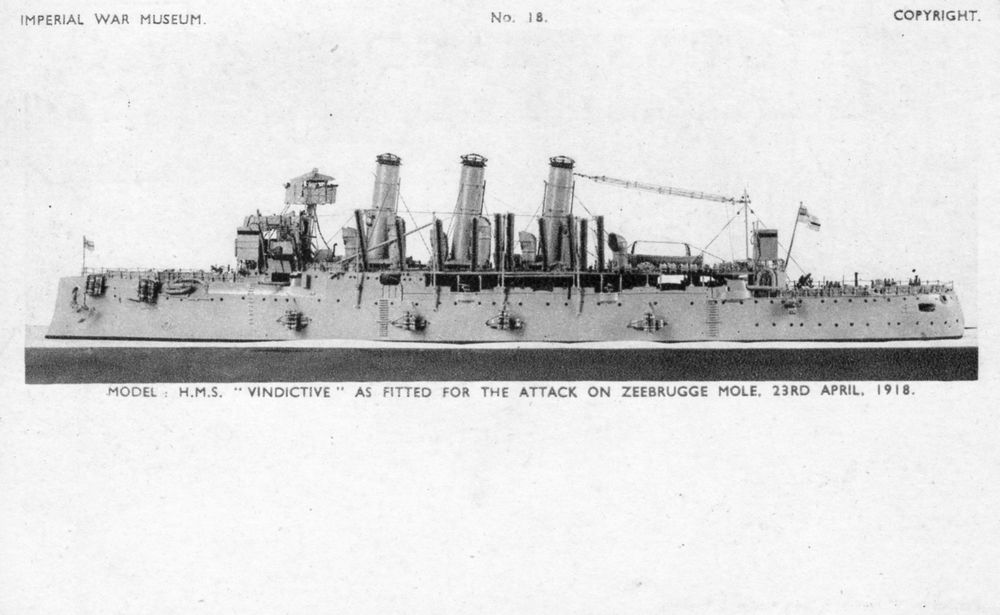
Catalogue number 46285 HMS Vindictive as an assault ship. Extensive modifications were made to HMS Vindictive in preparation for her role as an assault ship in the Zeebrugge raid. Fenders were fixed to the port side and we can see in this image the wooden ramps that would enable the assault force to clamber onto the defended mole. During its approach to the mole, the ship came under heavy fire and the ramps were damaged such that instead of the rapid disembarkation of the assault force necessary if the defending troops were to be overwhelmed, there was a trickle of men to face a hail of machine gun fire. 12.7cm x 5.2cm Printed image. |
 |
|
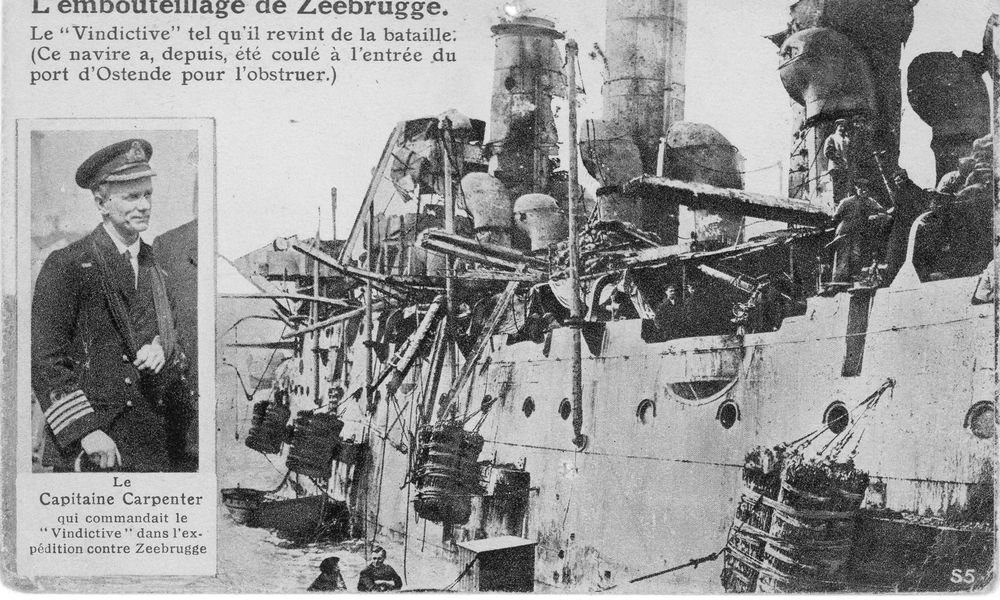
Catalogue number 104104 HMS Vindictive after the Zeebrugge raid. Damage to HMS Vindictive was extensive and much of the superstructure was shot away. We can see the remains of the assault ramps sticking out from the deck and the fenders on the port side. And yet the ship was patched up and participated in the second attempt to block the port of Ostend. 13.6cm x 8.9cm Printed image. |
 |
|
Catalogue number 104043 An Apollo class cruiser as a minelayer. This stereo-photograph shows one of the seven Apollo class cruisers that were converted to minelayers between 1907 and 1910, including Intrepid, Iphigenia and Thetis of the Zeebrugge raid. Over thirty mines can be seen along the starboard side and the mine rails project over the stern of the ship. There is one dark funnel band on the aft funnel which may enable someone to identify which Apollo class cruiser this is. 15.2cm x 6.5cm Gelatin silver print |
 |
|
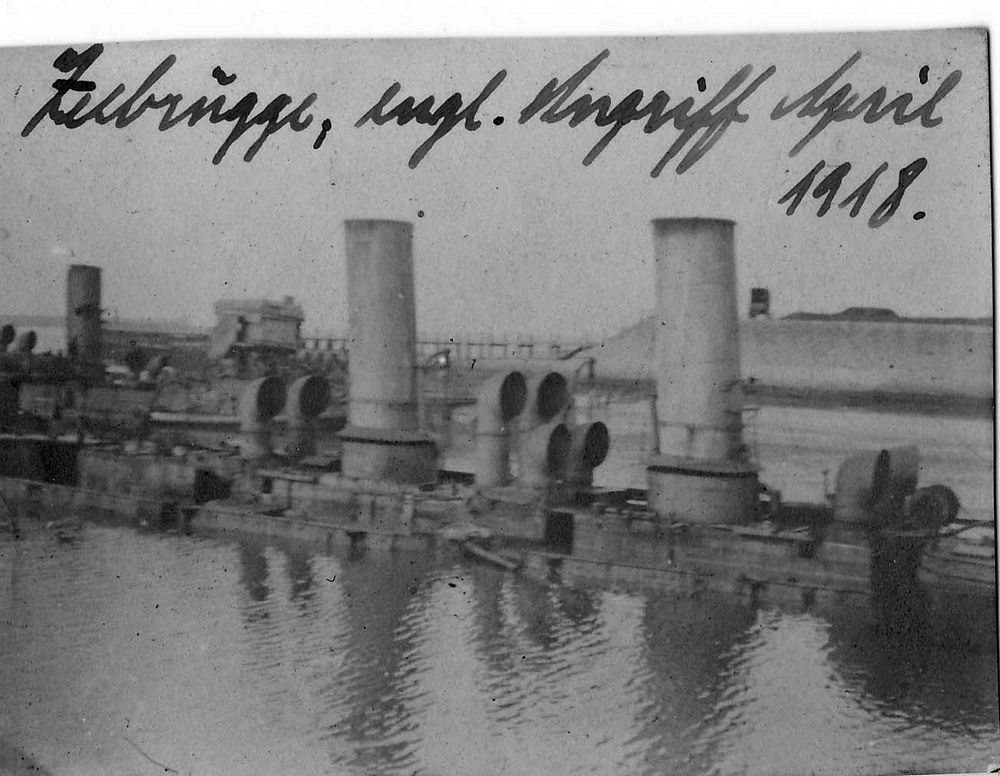
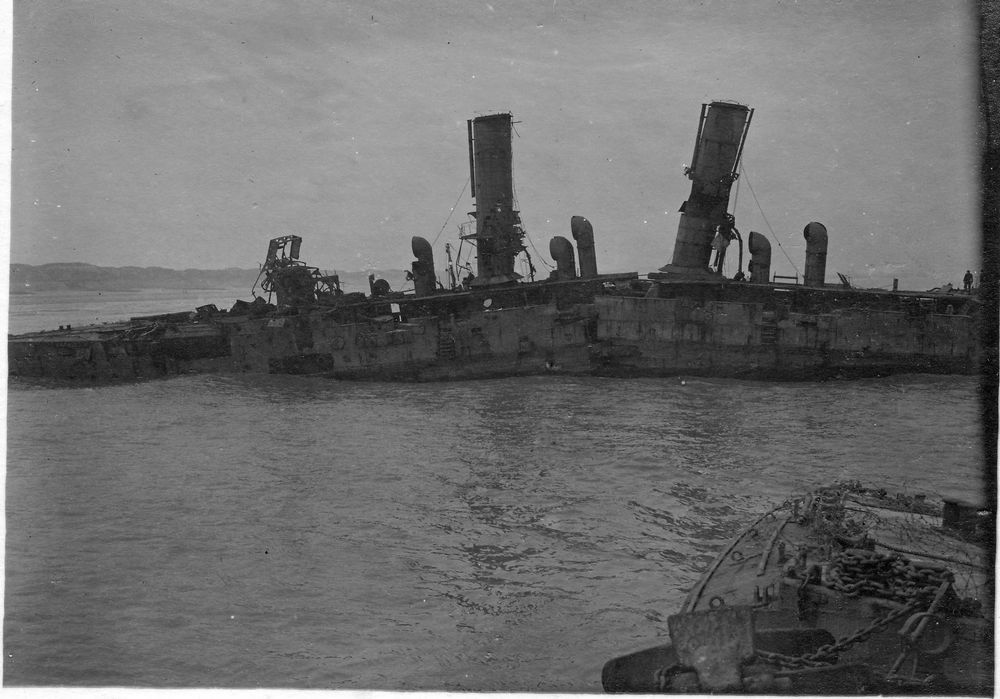
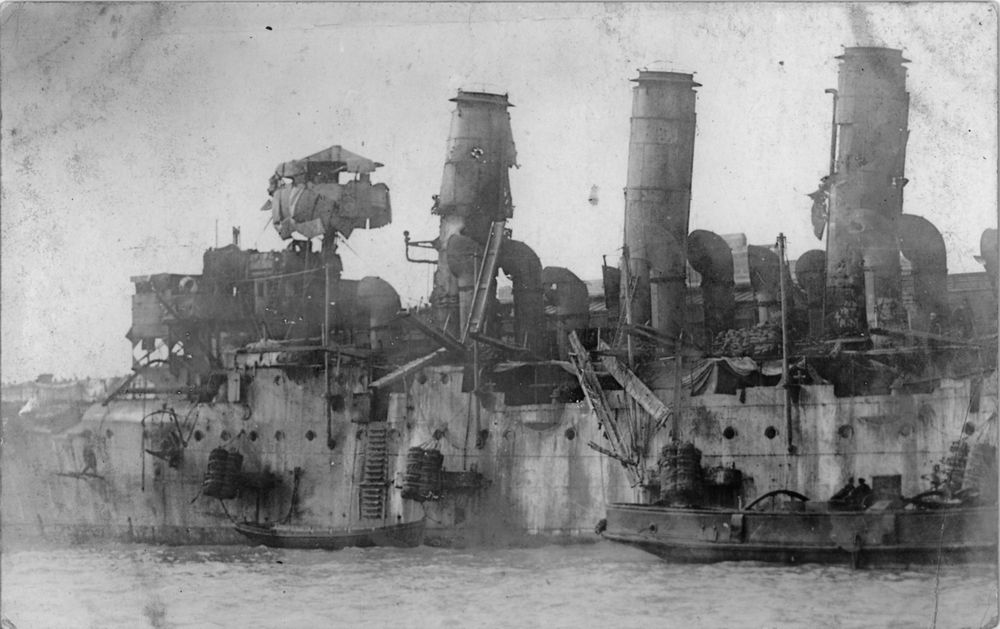
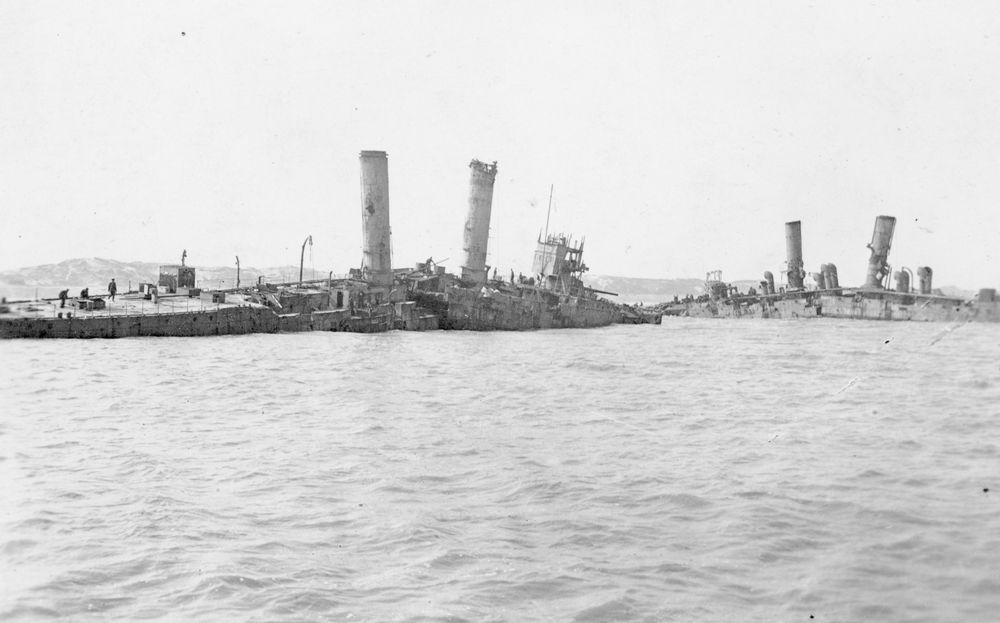
Catalogue number 35138 After the blocking attempt. This German photograph shows the sunken state of HMS Intrepid with HMS Iphigenia behind. The two ships seem to have got away with only light damage during the run in compared to HMS Vindictive. Recto: "Zeebrugge, engl. Angriff April 1918" ("Zeebrugge, English attack April 1918")in black ink. 5.6cm x 4.1cm Gelatin silver print |
 |
|
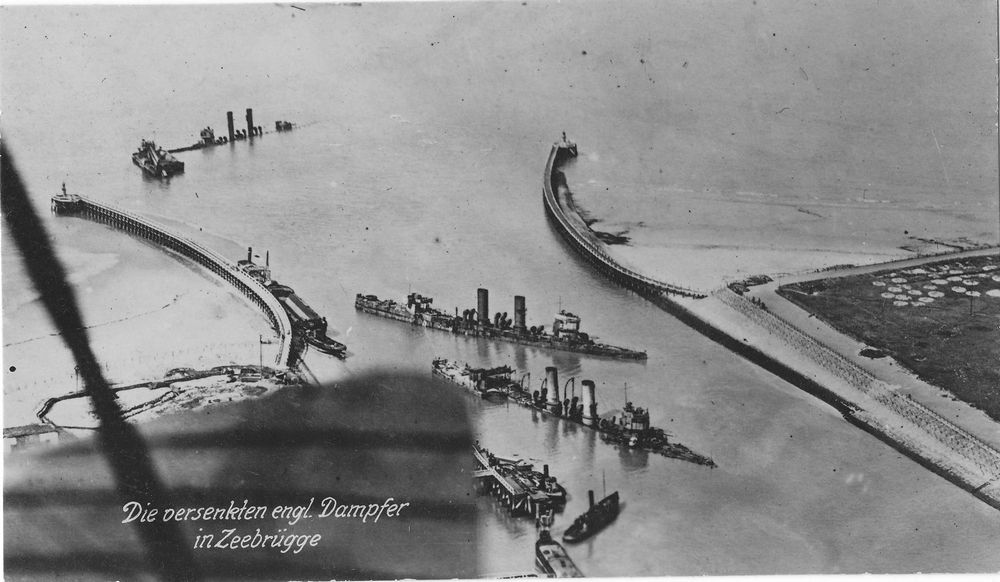
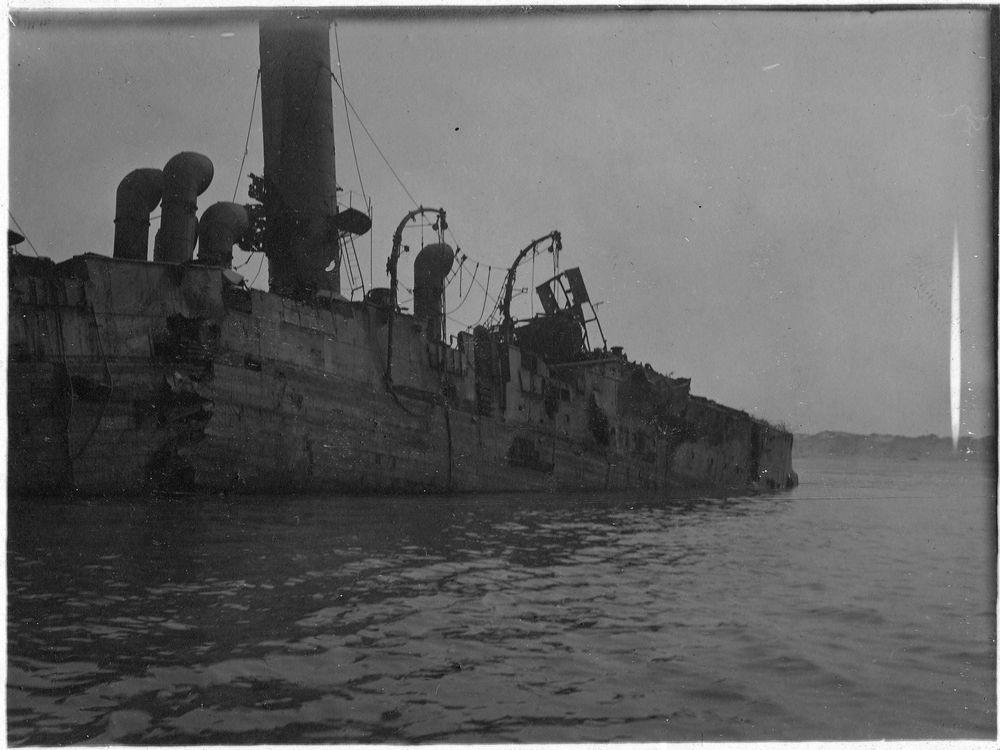
Catalogue number 35136 German aerial photograph. On the approach to the harbour, HMS Thetis got entangled in the net boom defence and became difficult to manoeuvre, finally running aground on a sand bank before reaching the entrance. A dredger is moored to the bows of HMS Thetis. Work is underway to remove the two wooden quays to the West of the entrance (immediate foreground) and once dredged, there was sufficient space for the passage of submarines. Recto: "Die versenkten engl. Dampfer in Zeebrugge" ("The sunken English ships at Zeebrugge"). 11.9cm x 6.9cm Gelatin silver print. |
 |
|
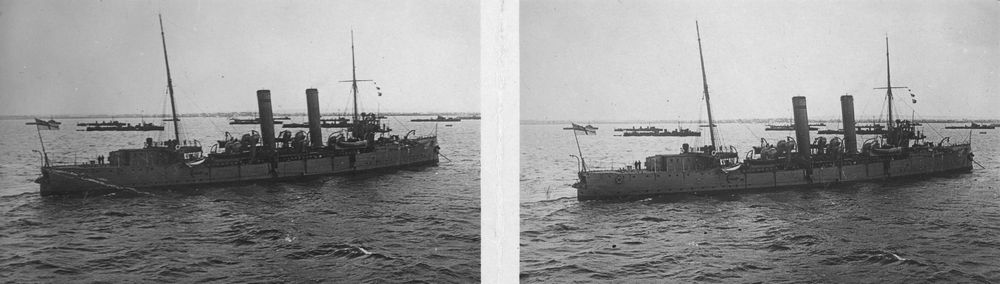
Catalogue number 45218 HMS Thetis A fine view of HMS Thetis during her heyday. She was another obsolete Apollo class cruiser that the Admiralty was prepared to sacrifice in an attempt to stop German submarines using the port of Zeebrugge. HMS Thetis was laid down in 1889, completed in 1892 with two 6-inch quick-firing guns, six 4.7-inch, eight 6-pounder quick-firing guns, a 3-pounder and four machine guns. Like the other Apollo class cruisers, she could make 18.5kts but this class were considered wet ships and poor sea-boats. Several, including HMS Thetis, were converted to minelayers during 1907-10. 13.4cm x 8.4cm Gelatin silver print |
 |
|
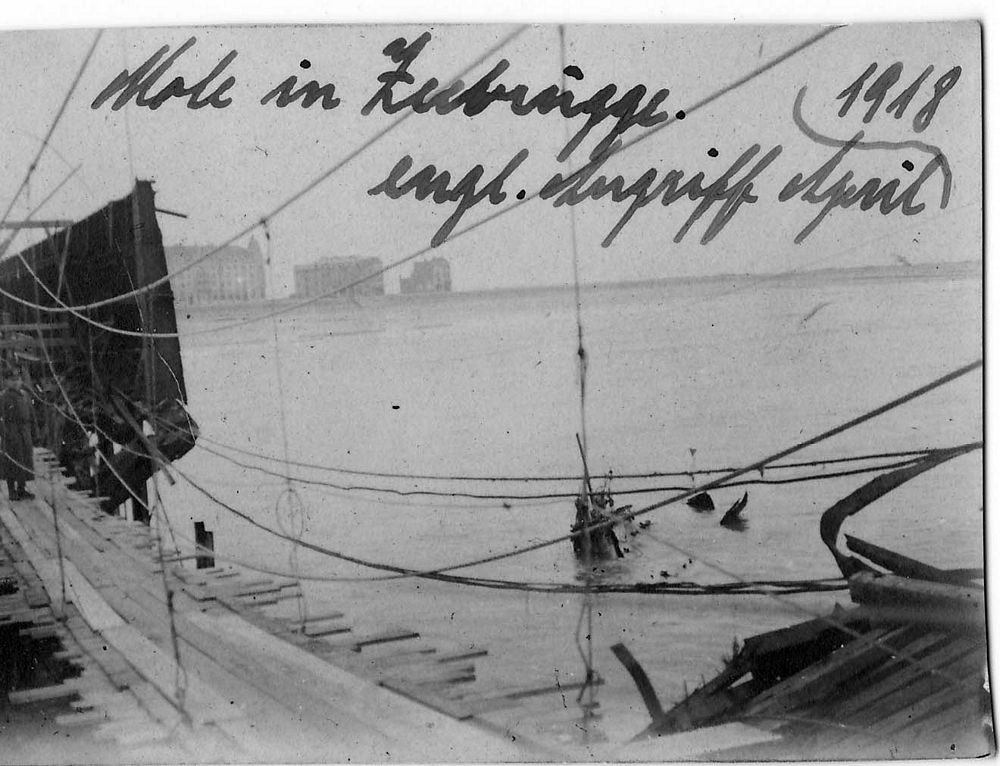
Catalogue number 35141 Blowing up the viaduct. To prevent reinforcements reaching the end of the mole during the diversionary attack, the Royal Navy submarine HMS C3 was filled with high explosives and was run into the metal viaduct that linked the mole to land. Imagine the courage of the crew of six who, once satisfied that their craft was in the right place, set the fuses and left the submarine in a skiff to be picked up later by a Royal Navy motor launch. A second submarine, HMS C1 lost its tow when crossing the Channel and arrived too late to take part in the action. Recto: "Mole in Zeebrugge. engl. Angriff April 1918" in black ink. (Mole at Zeebrugge. English attack April 1918) 5.6cm x 4.1cm Gelatin silver print. |
 |
|
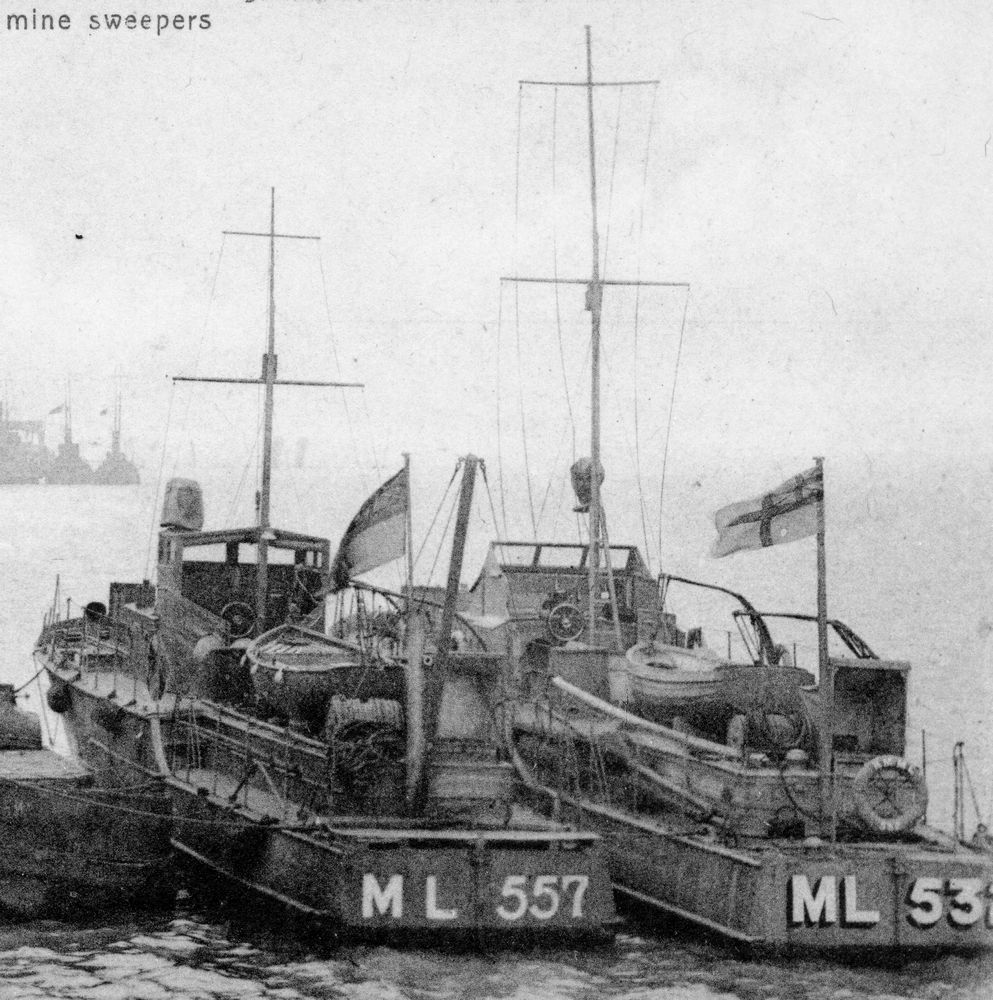
Catalogue number 13025 Royal Navy motor launches. These motor launches played numerous roles in both the Zeebrugge and the two Ostend raids, guiding the larger ships to the harbour entrances and especially evacuating the crews from the block ships as well as the dead and wounded. To the left of the image is ML532 which was one of the launches that escorted HMS Brilliant and HMS Sirius on the first Ostend raid, laying smoke to try and obscure the cruisers from the German guns. 13.7cm x 8.7cm Printed image. |
 |
|
Catalogue number 30030 Handley-Page 0/400 with civil markings In late September 1917, Handley Page 0/400 (HP 0/400) bombers had been used in an attempt to destroy the lock gates of the Zeebrugge-Brugge canal and so empty part of canal. Later, in the aborted operation to block Zeebrugge on the night of 11th to 12th April 1918, a diversionary strike by HP 0/400 bombers was planned to distract attention from sea. Despite the recall, a HP 0/400 bombed coastal batteries in and around Zeebrugge. The Handley Page 0/400 was a twin-engined heavy bomber, bomb load 1,650lb (748kg), wingspan 100ft, speed under 100mph, initial rate of climb 500ft/minute - quite a lumbering monster! At the end of the war, many HP 0/400s, over 400 had been built during the period 1918-19, were turned over for use as interim civil transport aircraft by the Handley Page Air Transport company. Shown here is G-EAMA which crashed and was damaged beyond repair in December 1920. Verso: "Nov 26,1920. This is not in Mr. Bant's collection see Fuller with small bag" in black ink and pencil. 13.5cm x 8cm Gelatin silver print |
.jpg) |
|
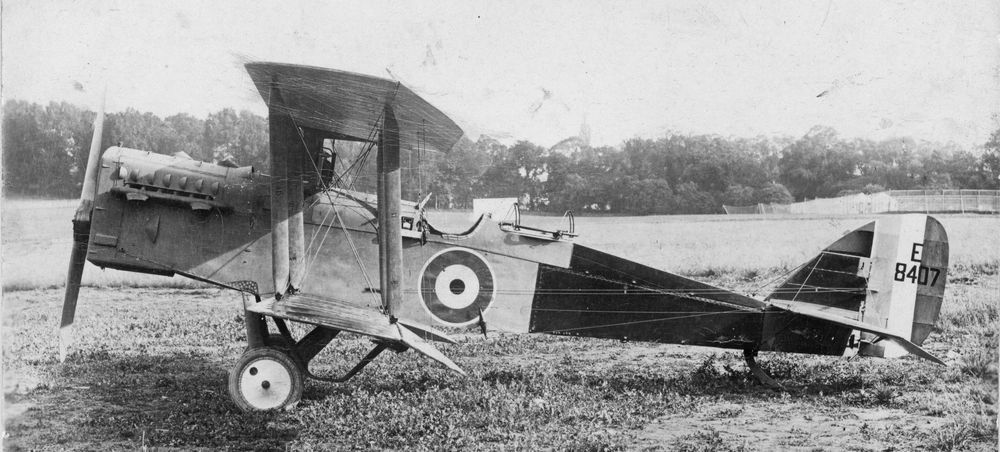
Catalogue number 106051 De Havilland DN-9A Early on the 22nd April and as the Germans were looking over the remnants of the British attack, a Royal Air Force De Havilland 4 biplane bomber broke through the cloud over Zeebrugge and flying at low-level, shot up the harbour before disappearing into the cloud again. A symbolic gesture after the disaster of the previous night. The De Havilland 4 aircraft of 202 Squadron had, prior to the blocking operation of 22nd April, taken aerial photographs of the whole defence system of Zeebrugge and Ostend. Shown here is a De Havilland 9A bomber, very similar to the DN-4.The port side Vickers machine gun is absent but we can see the opening for the ammunition belt and behind the pilot's seat is a Scarf ring for the observor's Lewis gun. Like the DH-4, this aircraft could carry two 230lb.or four 112lb. bombs. 13.7cm x 8.5cm Gelatin silver print |
 |
|
Catalogue number 35144 The 1st attempt to block Ostend harbour. This German photograph is probably of HMS Sirius (note scroll-work on bow, bridge intact) wrecked off the Ostend coast after missing the harbour entrance. Both blockships came under intense machine gun fire on the run-in and were hit by accurate fire from heavy guns. We can see three direct hits just below the bridge. 11.8cm x 8.3cm Gelatin silver print |
 |
|
Catalogue number 35146 HMS Brillant aground off Ostend. HMS Brilliant probably (aground near to the coast, bridge burnt-out). Note what appears to be the wooden sheathing especially around the break in the hull. Ten Apollo class cruisers, including HMS Brilliant, were sheathed in wood and copper for tropical service. 11.1cm x 8.3cm Gelatin silver print |
 |
|
Catalogue number 35145 HMS Brilliant seen from HMS Sirius. HMS Brilliant probably (no scroll-work on bow, bridge burnt-out, photograph taken from second ship - HMS Sirius - perpendicular to this one) wrecked after running aground at full speed, the marker buoy for the harbour entrance had been moved further to the East by the Germans. When HMS Brilliant went aground, HMS Sirius was steaming close alongside and ran into her. 11.1cm x 8.3cm Gelatin silver print |
 |
|
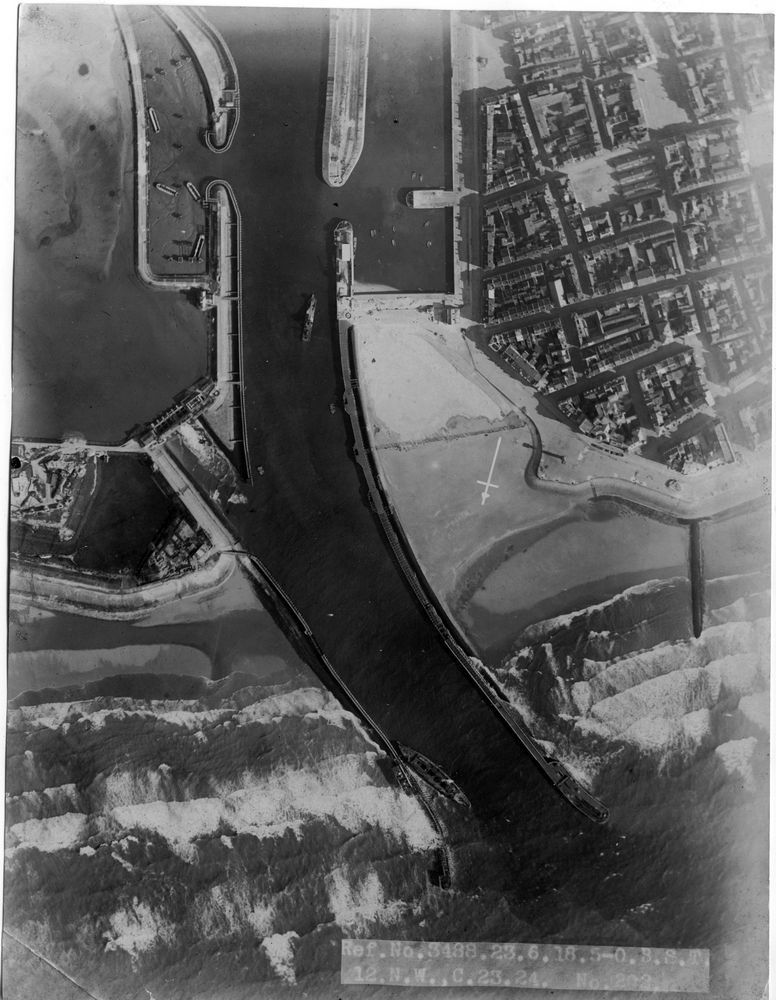
Catalogue number 30038 Aerial view of Ostend harbour. This is a British aerial photograph taken some weeks after the second attempt by the Royal Navy to block the harbour of Ostend. The attack took place on the night of 9th to 10th May 1918 and once again HMS Vindictive was called upon, this time as the blocking ship. She was crewed by many of the officers and men from HMS Brilliant and HMS Sirius as well as men from HMS Vindictive at the time of the Zeebrugge raid. There was no mole at Ostend and for this raid, the Royal Navy used its own marker vessels to find the harbour entrance. HMS Vindictive can be seen bow on against the Eastern harbour jetty. Recto: "Ref.No.3488.23.6.18.5-0.B.S.T. 12.N.W.,C.23.24. No.202" which we may interpret as Ref.No.3488 of 23rd June 1918 at 5 o'clock British Standard Time, grid map reference 12 NW, C 23 and 24. 202 was the squadron that made high level photographic reconnaissance flights of this part of the Belgian coast. 15.5cm x 20.4cm Gelatin silver print |
 |
|
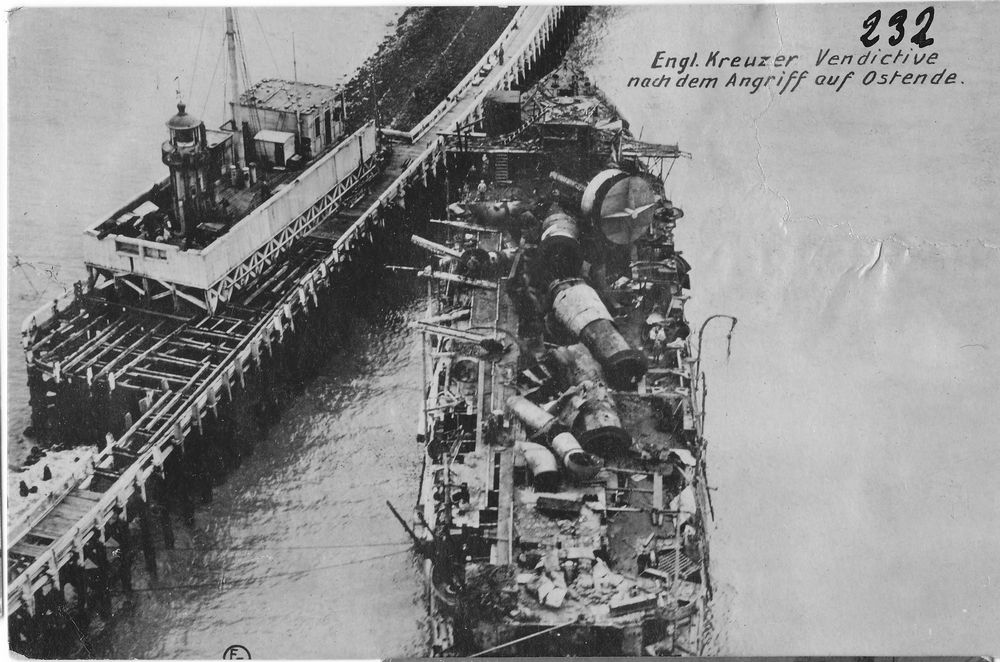
Catalogue number 35147 HMS Vindictive alongside the jetty. Whilst searching in the fog to find the entrance to Ostend harbour, HMS Vindictive came under heavy fire and after the starboard screw failed, it became impossible to continue the blocking manoeuvre. With the Commander dead and the ship not answering the helm, she was taken alongside the eastern pier and grounded. The ship was abandoned and sunk by explosive charges. In this photograph we can see that demolition of the superstructure by the Germans is underway with funnels, ducts and the mushroom-shaped foretop (famous from the Zeebrugge raid) have been cut-down. Care was taken prior to the raid to strip HMS Vindictive of metals such as bronze and copper to prevent Germany from recovering these much-wanted metals. Recto: 3Engl. Kreuzer Vendictive(sic) nach dem Angriff auf Ostende" (English cruiser Vindictive after the attack at Ostend). 11.9cm x 7.8cm Gelatin silver print |
 |
|
Catalogue number 123107 H.M.S. Vindictive after the raid Poor Vindictive got badly knocked about as we can see here. The fenders are still in place but most of the wooden landing ramps are wrecked. The armoured foretop with its mushroom lid can clearly be seen, this was the only part of the ship that would be higher than the mole. Note, hence, the height that the landing party would have to climb to get onto the mole Verso: American Azo stamp box for the period 1910 to 1930. The postcard was purchased from the U.S.A. 13.7cm x 8.6cm Gelatin silver print |
 |
|
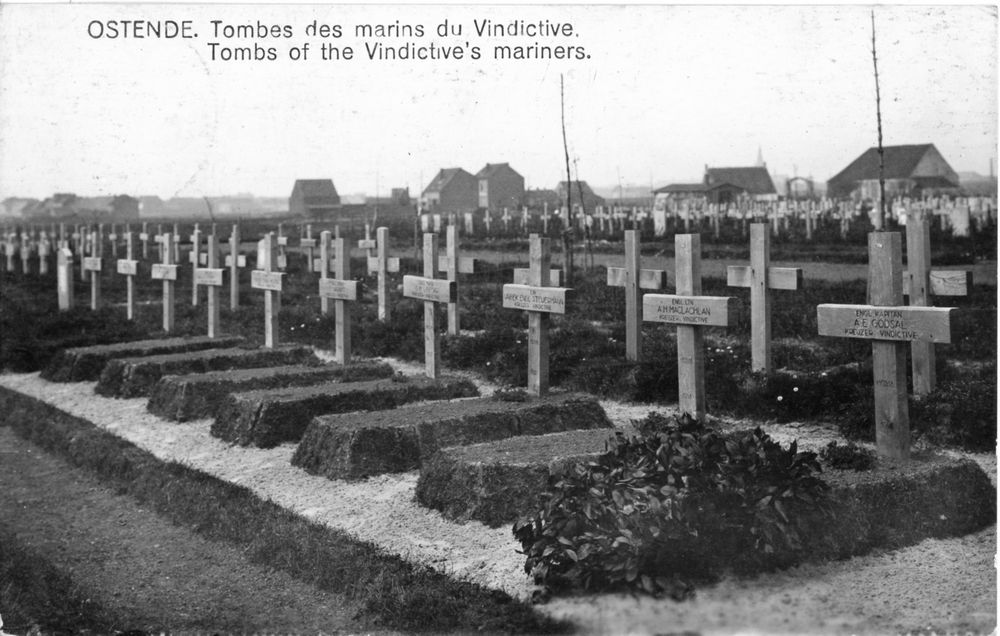
Catalogue number 124097 Graves of those killed in the second Ostend raid The dead were buried by the Germans with full military honours. Note the grave of Commander Godsal, killed on the bridge as H.M.S. Vindictive was attempting to block the channel. Verso: Postcard sent from "Mama" in Belgium to family in Bridgeport, U.S.A., 1920 13.5cm x 8.6cm Printed image |
 |
|
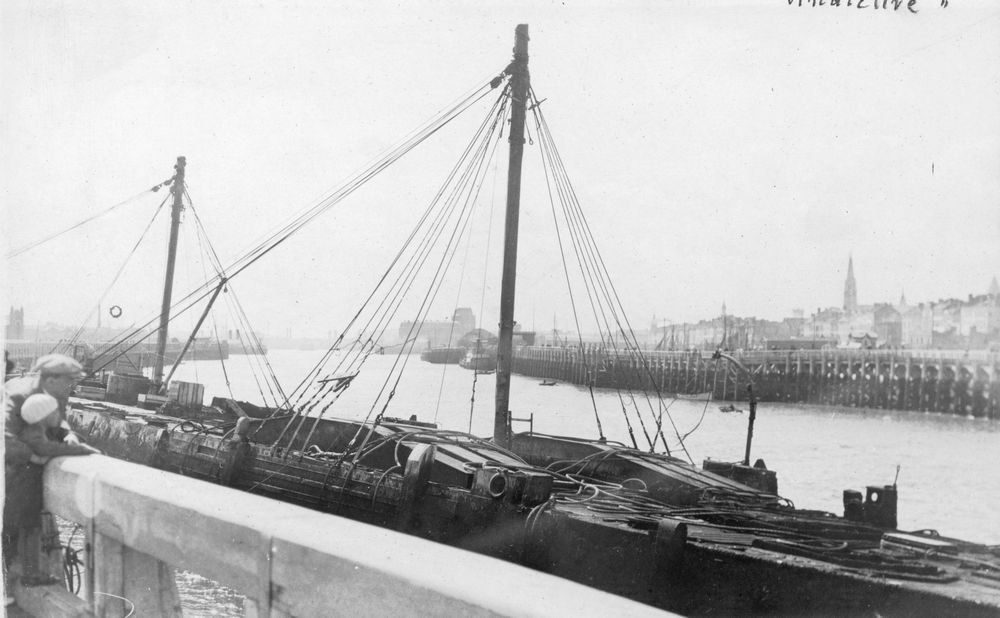
Catalogue number 121002 The wreck of H.M.S. Vindictive, Ostend The Germans stripped the wreck of everything that could be useful. 12.9cm x 8.0cm Matt gelatin silver print |
 |
|
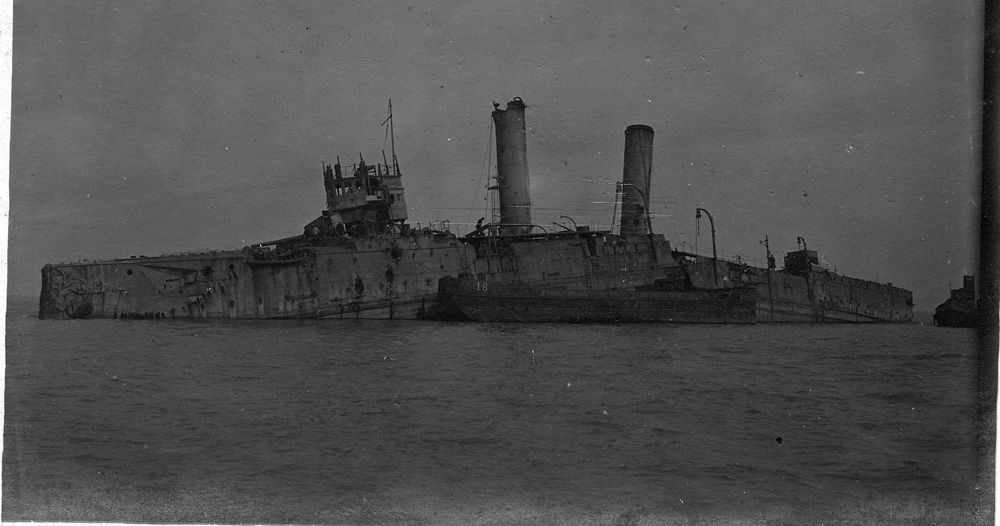
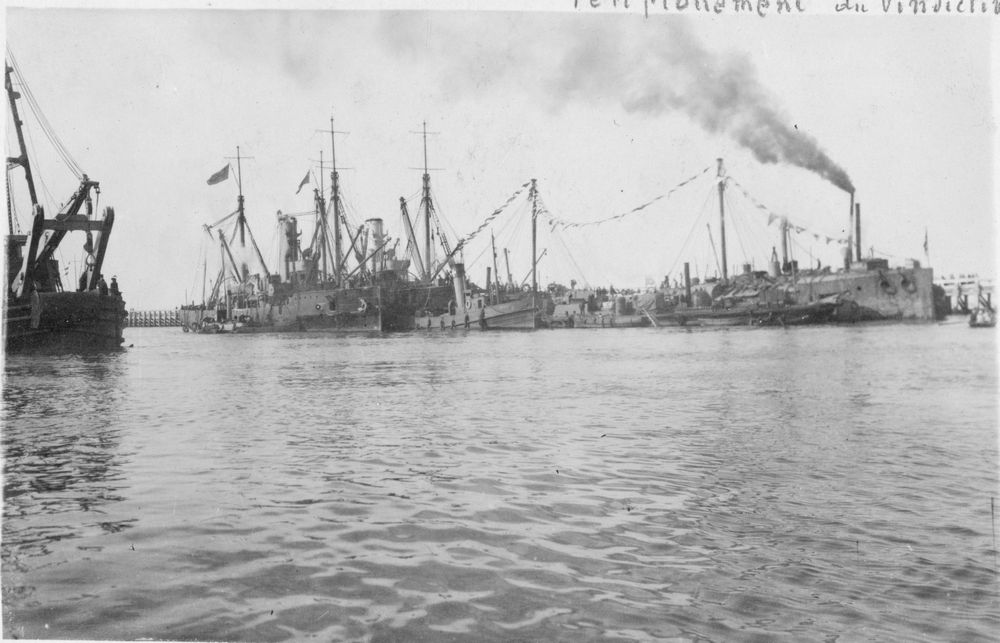
Catalogue number 121002 Attempted salvage of H.M.S. Vindictive The wreck was raised in August 1920 and moved out of the way of navigation but, with her back broken, she was subsequently broken up. We can see several heavy lift ships and floatation barges alongside H.M.S. Vindictive. 12.5cm x 7.9cm Gelatin silver print |
 |
|
Catalogue number 126033 H.M. ships Brillant and Sirius aground off Ostend. During the first Ostend raid, H.M. ships Brilliant and Sirius were misled by the displaced buoys and missed the harbour entrance. They ran aground and subsequently became sitting ducks for the coastal guns. 13.1cm x 8.1cm Matt gelatin silver print |
 |
|
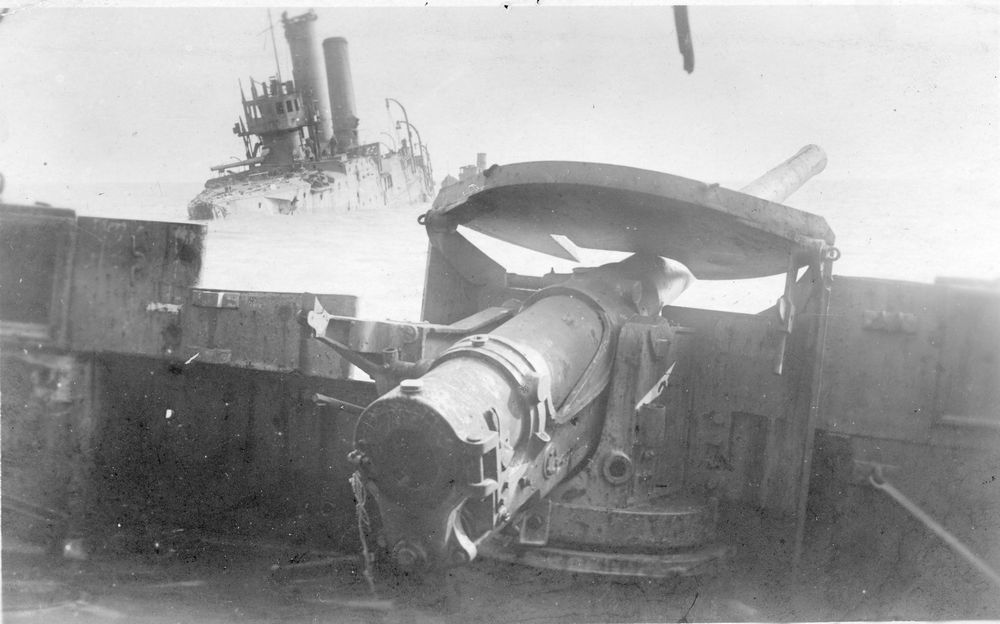
Catalogue number 106053 One of the guns on H.M.S. Sirius. This photograph shows one of the six QF 4.7-inch (120 mm) guns on H.M.S. Sirius. The breech block has gone, probably removed when the ship was abandoned. 13.2cm x 8.1cm Matt gelatin silver print |
 |
|
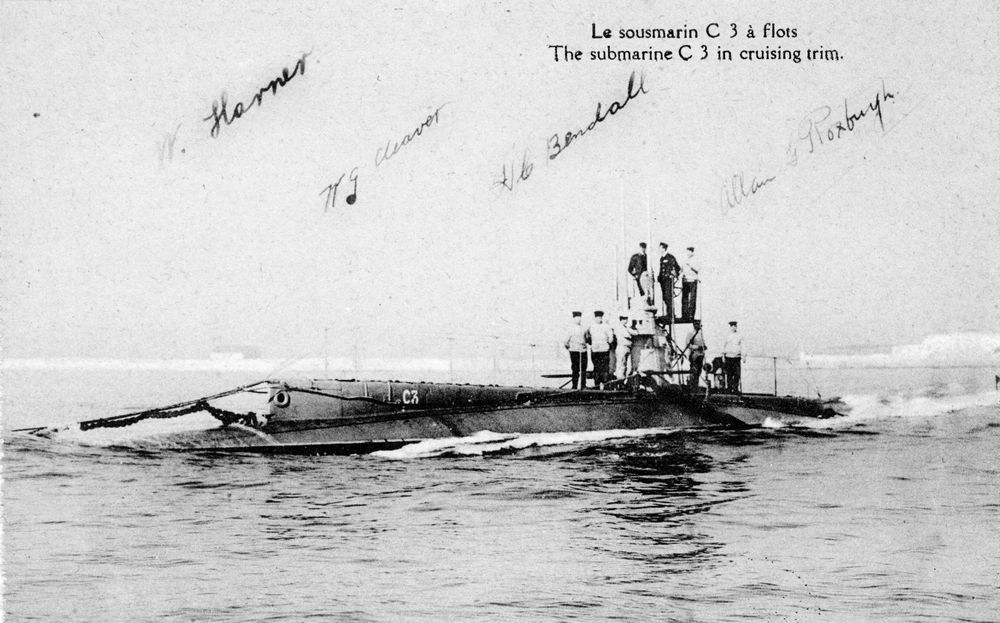
Catalogue number 35146 Submarine C3 destroys access to the mole H.M.S. C3 is shown here in cruising trim off Southsea around 1917. C3 was one of two C class submarines loaded with five tons of amatol to be exploded under the mole and so prevent reinforcements getting to the landing place. Petty Officer W. Harmer, Leading Seaman W. Cleaver and Stoker H. Bindall plus Engine Room Artificer Allan Roxburgh (see signatures) were on C3 in the Zeebrugge raid. 14cm x 9cm Printed image |
 |
|
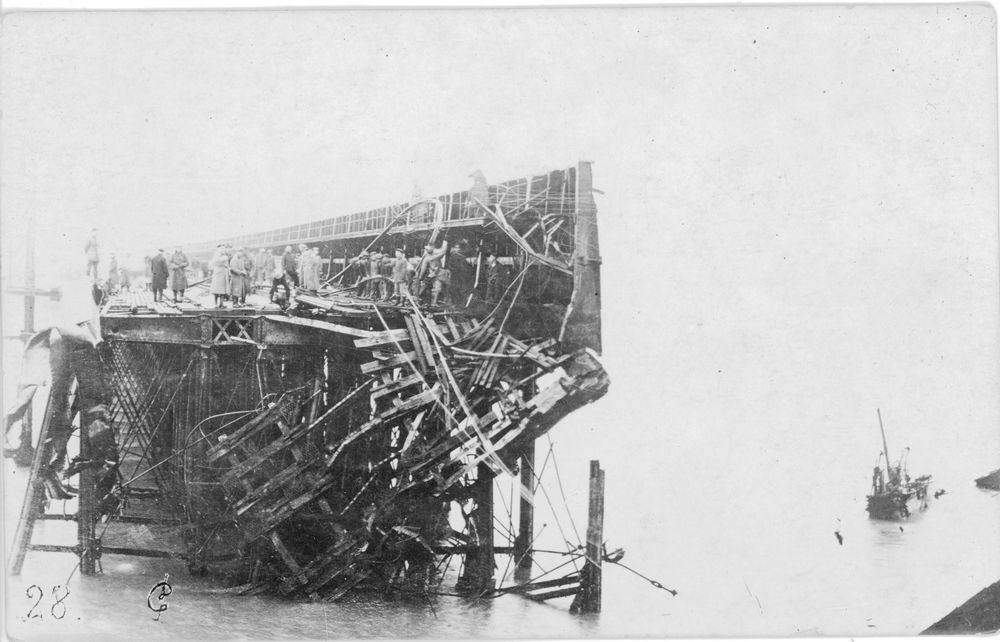
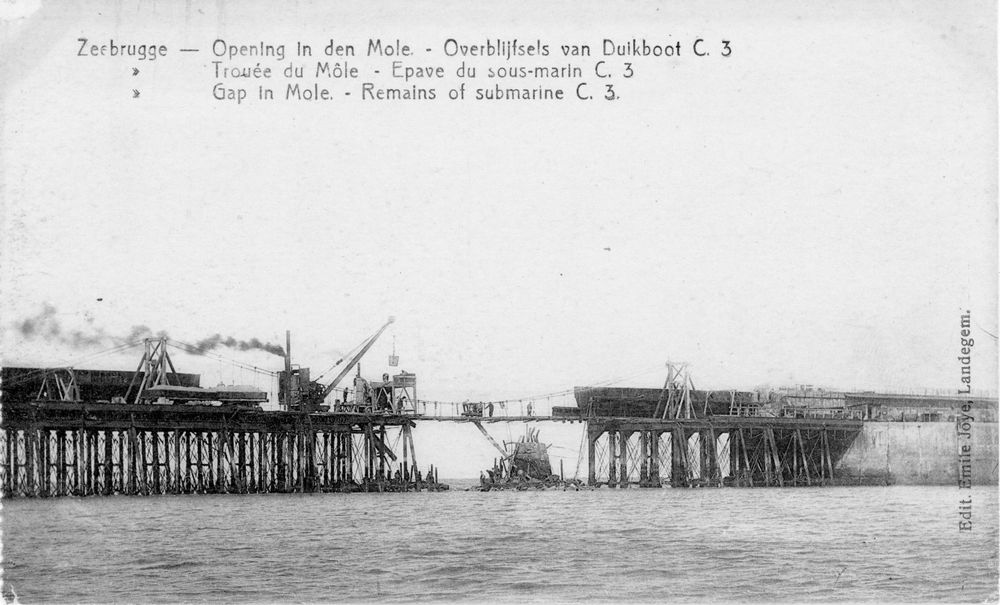
Catalogue number 126032 The damaged mole German officers and sailors are evaluating the damage to the mole caused by the explosion. Note the railway lines that could have been used to rapidly bring up reinforcements and heavy weapons. The conning tower of C3 can be seen to the far right, it being blown back from the mole by the explosion. Verso: "Destruction of part of the mole at Zeebrugge 1918" in French and in light pencil 13.9cm x 8.8cm Gelatin silver print |
 |
|
Catalogue number 117073 Repairs to the mole Attempts were made to repair the mole, a steam crane has come up on the existing railway line and the concrete foundations for the piles are being laid. A temporary suspension bridge is in place and because it is low tide, we can see the remains of C3 in the gap. 13.8cm x 8.5cm Printed image |
 |
|
Catalogue number 117074 H.M.S. Iphigenia lying in the Zeebrugge channel, damaged mole in the background The ship has been stripped of guns and other equipment and there appears to be a Royal Navy sailor on the foredeck, maybe the photograph was taken after the war. In the background, we can see the gap in the mole made by the explosion of H.M.S. C3. 13.8cm x 8.5cm Printed image |
 |
|
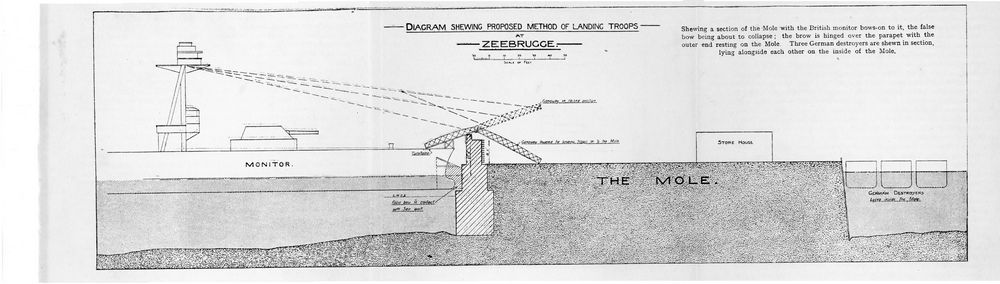
Catalogue number Project for landing troops, Zeebrugge Prior to the Zeebrugge and Ostend raids, Admiral Sir Reginald Bacon and his staff of the Dover Patrol had proposed to use a monitor equipped with a hinged bridge on the bow. The idea was that the monitor would run bow-on into the mole then lower the landing bridge onto the top of the mole wall, part of which was hinged and would fold down on the other side of the wall. The landing party would then storm over onto the mole. Admiral Bacon was replaced by Roger Keyes who planned the subsequent raids. Diagramme taken from "The Concise Story of the Dover Patrol" by Admiral Sir R.H. Bacon Credit: Hutchinson and Co., 1932 |
 |
|
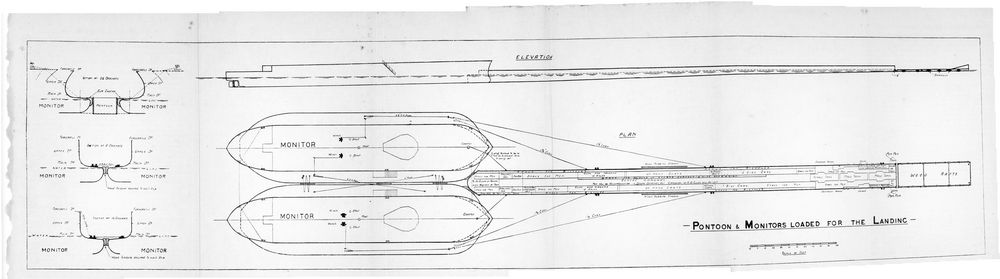
Catalogue number Project for an amphibious landing on the Belgian coast Admiral Bacon and his staff planned an amphibious landing on the Belgian coast at Middelkerke using three huge floating pontoons (170m long 9.8m wide) pushed forward by two monitors. On the pontoons were landing parties and their equipment including three tanks. The forward part of the pontoon was designed to get the tanks and equipment over the sea wall. Diagramme taken from "The Concise Story of the Dover Patrol" by Admiral Sir R.H. Bacon Credit: Hutchinson and Co., 1932 |
 |
|
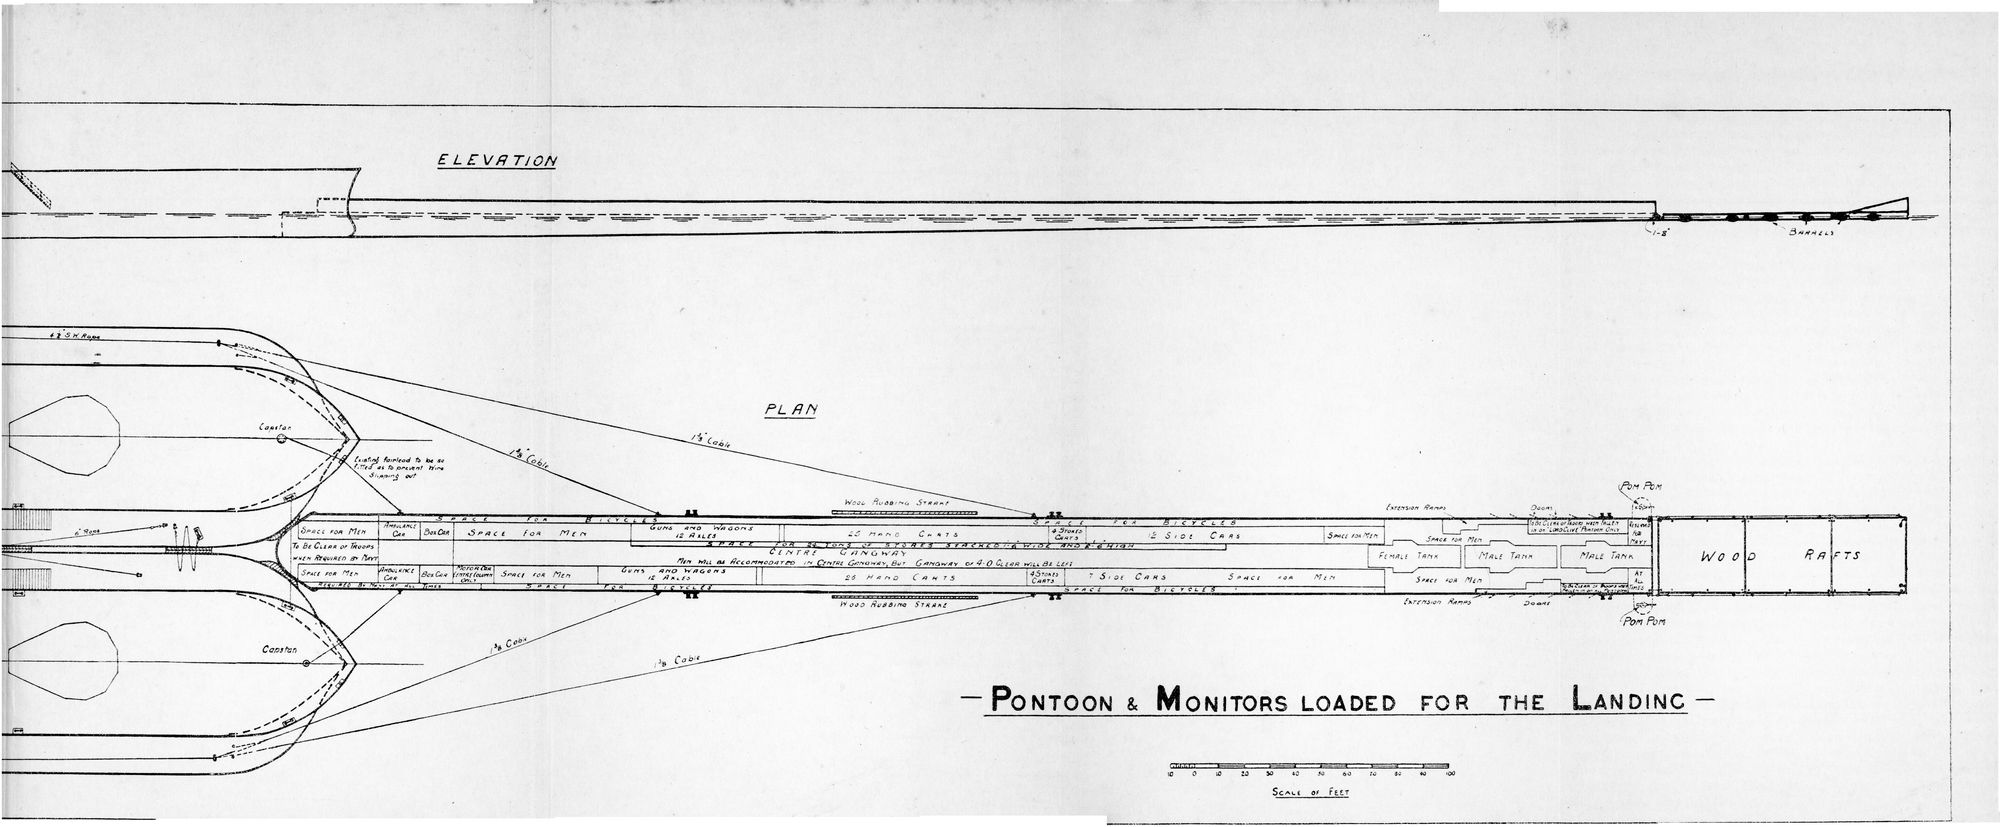
Catalogue number Detail of the landing pontoon The detailed view of the loaded pontoon shows the how the amphibious landing party was organized and its equipment including hand carts, side cars, bicycles, tanks and ambulance cars. Diagram taken from "The Concise Story of the Dover Patrol" by Admiral Sir R.H. Bacon Credit: Hutchinson and Co., 1932 |
 |
|
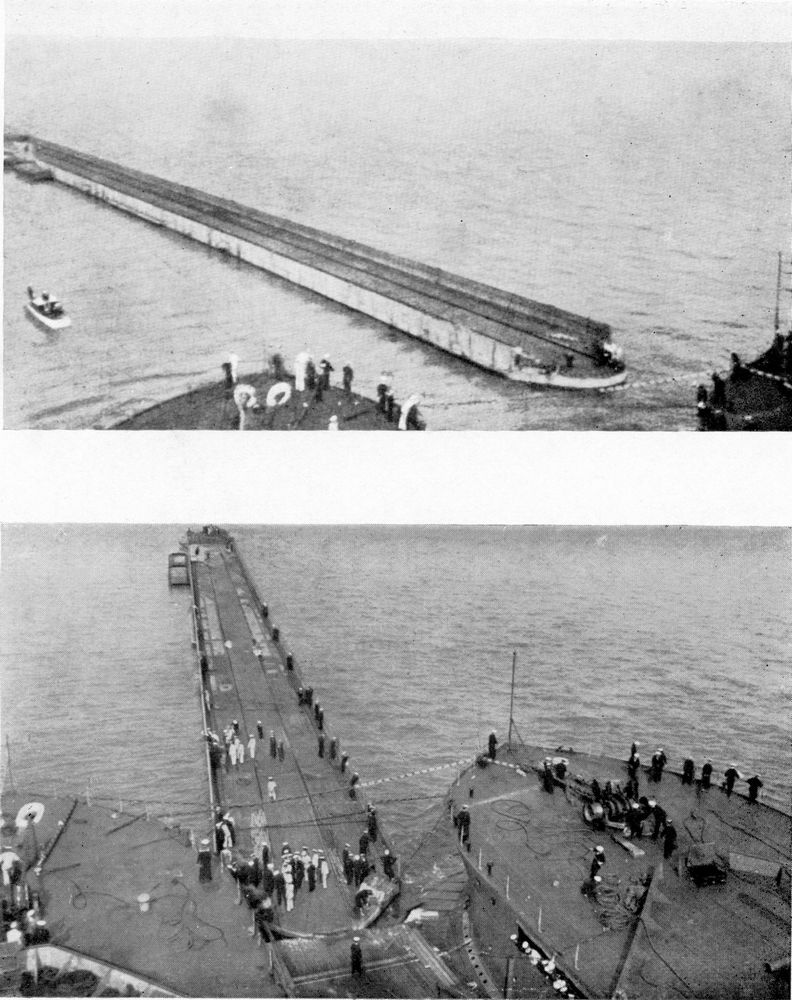
Catalogue number The pontoon being moored to the monitors The pontoon is being manoeuvred into place between the two monitors, surprisingly the monitor/pontoon ensemble was said to be stable at sea. Taken from "The Concise Story of the Dover Patrol" by Admiral Sir R.H. Bacon Credit: Hutchinson and Co., 1932 |
 |